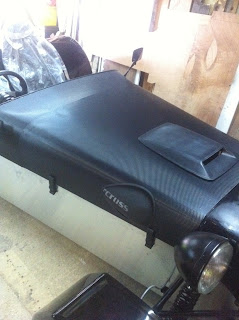
Wednesday, 14 December 2011

Bits and bobs....

Previous posts have mentioned a 'slack' dash forming and fitment but I got onto sealdirect.co.uk and found a great solution to cover the 3-4 mm gap and it works very well but whats more it looks very professional. One thing I didnt like was the facy that on the curves of the dash the seal buckled and lost the curve. I got some battery earthing lead which I cut down.....


Then using a slicone spray I inserted it in the tubular part of the seal.....


As can be seen above it nows have a perfect and professional looking curve!


Covers redone and final fitted with fixings sprayed in my little pant oven.....


Sill covers trimmed even further and just waiting edge trim.........

Monday, 5 December 2011

A VERY HAPPY CHAPPY TODAY!!

So after a few weeks of dissapointment and things not going well..... today she fired first time!! I took the injector loom off and tested them with a meter and all good, I wired a 9 volt battery to each injector and could hear them firing. So I was a bit lost but pleased at the same time as I knew that the wiring loom and injectors were good. It obiously meant fuel wasnt arriving at the the injectors which could only be mechanical.
I'd like to call this a school boy error and if I ever do it again I will but this is the first fuel injected engine Ive built and so its all a learning curve. Basically the fuel pressure reg was connected with the wrong hoses and as soon as I  changed them over and ran a line check I had fuel pi**ing out of the regulators union. I took it apart and saw the O ring was shot. I had a spare fuel rail dismantled it and swapped the O ring, tested it again and all good!! So next to connect the coil and see what happens..................................................... this is what happened!!

http://www.youtube.com/watch?v=IKuE0Htc5zA    YES YES!!!!!!!!!!!

Emotional will just about cover it and I am back on form BIG TIME. In addition to this the black wheels arrived and really do add that final dimension to the build and final look. This could be the last update for a while because Lollys got a date now to be induced so I could be having the best week ever!!!!


Sunday, 4 December 2011

On and on and on.......

Well the ECU arrived back from Omex telling me everything I knew they would, ie it works and it works with my lead and my serial converter. They said they'd uplodaded a start up MAP for it and had geustimated the inlet allowance for my GSXR 1000 throttle bodies. So having had the VIN plate welded in by a mate I fueled the car (nervously) and set about trying to start it. I have good spark, I have fuel to the injector rail and I have air. So why wouldnt it start?!!!!! After a bit of fault finding with my mate Matt. I removed the fuel rail and cranked the engine and it seemed that not one of the injectors were firing, so in essence its looking like either a fuel rail or ECU problem. So tomorrow I'll be on the phone to Omex to see if  what they think.
OK so not the result I was after but  the crank position sensor and others are functioning so its not the end of the world. I know for a fact its going to start.

To add to the delay this weekend some new parts arrived, all of them the wrong bits even after explaining in detail over the phone what I needed. Well anyway my new wheels arrive on Monday so I got my faithful paint oven out to spray the wheelnuts black. I also trimmed, cut and trial fitted the stainless steel sill covers.

Chip Foose wont be jealous but this is my little paint oven :-)


Stainless sill covers needed quite a bit of trimming....


A notice for my workshop landlord or his gardener....


Thursday, 1 December 2011

Things to get on with

I am adamant about the finished quality and I dont want the interior to look like a long shopping trip at Halfords so I turned my mind to the gear and handbrake gaiters. I trawled the websites and mod shops but couldnt find anything on my line of thinking. Soooooo........ I got some genuine BMW italian leather items and set to work........

Some of the cars Ive seen have really limp looking leather in these areas so I went to the shed and dug out a gaiter from my old Porsche, it has a hard rubber liner for the Italian leather so I pulled it out and cut it down to meet the profile of the new Beemer item.........


Once I'd sorted that I inserted it into the leather and hey! A really sturdy looking high quality bit of kit. Then I set about making a threaded insert for the gearknob........


The results in my opinion are well worth 3-4 hours labour and will make it look loooooooaaaads better!
No plastic surrounds, clips or other malarky. (thank you BMW & Porsche for the inspiration)


Monday, 21 November 2011

Monster Munch!

Apart from the fact that I dropped the car on the jack and it munched and went straight through my brand new radiator Im stillreasonably chirpy......
BUT OK, so I'd already read many many peoples comments and blogs saying 'the last 5% of the build takes 95% of the time' but bugger me its true!! Ive been back round the car and re-routed a lot of wiring after reading many peoples IVA fail sheets. The good thing is that I am more experienced now than I was and when I looked at some of my wiring even I wouldnt have given it a pass. Now its sorted!


Im 42 yrs old and I rebuilt my first car at 15 yrs old, Ive rebuilt many more since but NEVER have I had to take my laptop over to it.............. very frustrating indeed. I tried to upload the OMEX start map and seem to have an RS232 and USB issue!!!! What has that got to do with anything petrol headed ???


NOT LONG NOW........(He hopes)

Monday, 7 November 2011

Oil pressure guage and fuse box

The ETB Digidash OPG needs an adaptor to fit the Zetec, when I got it I was concerned at the tightness of the thread so phoned ETB. They told me the nature of the thread is to seal the joint and so is designed this way and to only wind it in 4 or 5 turns...


So now its fitted in the Zetecs original location for what was the oil warning light. The good thing about this sensor is that it does both pressure and the warning light.


I'd been thinking a lot over the last few months of how to tidy all this wiring behind the dash. It took me a good hour of messing around and scratching my head about where it was all going to go and just before thinking 'Sod it Ive had enough' I came up with my own bracket...


I mocked it up as a pattern and it worked really well and was tempted to use the mock up (below) but that was me being lazy so I made a new one from the pattern/mock up, sorry I forgot to take a photo before fitting but its just a tidier version of the one below.


A very tidy and accessible solution and Im very pleased!


Thursday, 3 November 2011

Dash fitment

More work on the Digidash and got it all powered up and sorted some wiring issues with the premier loom. Basically the main beam switch had been wired to the dip relay resulting in no warning light.


Id trial fitted the actual dashboard and wasnt entirely happy with the fitting so having rivnutted the back panel I decided to use some plastic spacers to bring the dash forward a little


Then araldited them in place to save fiddling around


I marked one of the drill wholes on on one bottom corner and then on the other side I passed a rivot pin through the hole with tippex on it to get an accurate drill hole for this side


I had some problems with fuel guage reading reverse so removed the Smiths sender and sure enough it was the right resistance but read in the opposite direction. I modified the ETB sender to fit my tank using the suggested block connector. After removing the old one I made a sticky stick from fuel pipe and masking tape to remove any swarf from the tank


New sender now fitted


and dash now reads correctly. Next one was the brake light warning not coming on which was an easy fix. Although the handbrake switch looked like it was connecting with the handbrake in the off position it actually needed a little bit more so a couple of washers were placed and problem solved 


Nearly there now, dash needs a bit more adjustment and is then ready for final fitting which will happen when I've finished tidying things up behind the dashboard


Monday, 31 October 2011

ECU and Digidash

Started work on the dashboard and ETB digidash...

Ive used the template I found online at ETB and marked out the dash...


Quite a bit of wiring involved and stuff that needed to be fathomed out....


Omex 600 now in place and wired in....


I have to take my hat off to the boys at both ETB and Omex, they've been top notch!!

Tuesday, 25 October 2011

Graphics

The wrap on the exterior is now finished and I moved on to my graphic concept.....


Which I think has worked out really well.....


unleash the beast........!!


Digidash and ECU next and we're good to go!! :-)

Thursday, 6 October 2011

Light Fantastic!

A few minor changes and now everything electrical on the  car is working!


A video update for my mate in the Cayman Islands, no commentary this time Mick enjoy the silence...

Monday, 3 October 2011

Bonnet (again)

As previously mentioned I wasnt 100% happy with my original attempt at wrapping the bonnet so this weekend I did again with some help from my mate Frampy. It was much easier as 2 man job and it now looks amazing!


Also I got the horn working. It took a while to work out that it has switched earth and not a switched live!
Having filled and attempted brake bleeding last week I knew there was air getting in the system somewhere and having checked all the pipe unions I left it a week and found the leak. It wasnt any of the actual brake pipes but the brake light sensor which I removed wrapped in PTFE and refitted it and all is good now!

Wednesday, 28 September 2011

How to revamp a cheap ebay steering wheel!

I bought this 2nd hand Mountney steering wheel on ebay at the start of the project, it looked a little tired so I got to work on it........


With all my recent experience of vinyl wrapping this was a little bit  more added to my vinyl education.....

...and I'm quite pleased what you can do with a bit of an offcut and some patience!

Sunday, 25 September 2011

More wrapping and some more wiring

More carbon wrapping and some more wiring has gone on and Im quite happy. However it does feel like theres not many technical updates going on the blog recently but theres not a lot left to do and I dont think anybody needs to hear about brake bleeding do they? hardly sexy!


Tuesday, 20 September 2011

Carbon Wrap...again..

Having very successfully wrapped the scuttle in carbon fibre material I thought hey! lets do the bonnet do as it looks so good. I removed the bonnet scoop and got started.....

I did it indoors for heat purposes and laid it all out in accordance with most internet instructions. This is a much bigger panel than the scuttle and off the car is very flexible.....

I cracked on and to be fair it started looking really good......


The bottom line is that the photos may look good but I may take it off and do it again. Theres a few points most wouldn't notice but I know they're there and I know they'll bug me in the long run. On the upside the finished article is going to look very trick indeed!....